05 · Guide
Stitches, rows & colours
Draw straight and diagonal drop-down stitches and keep the chart crochet-safe.
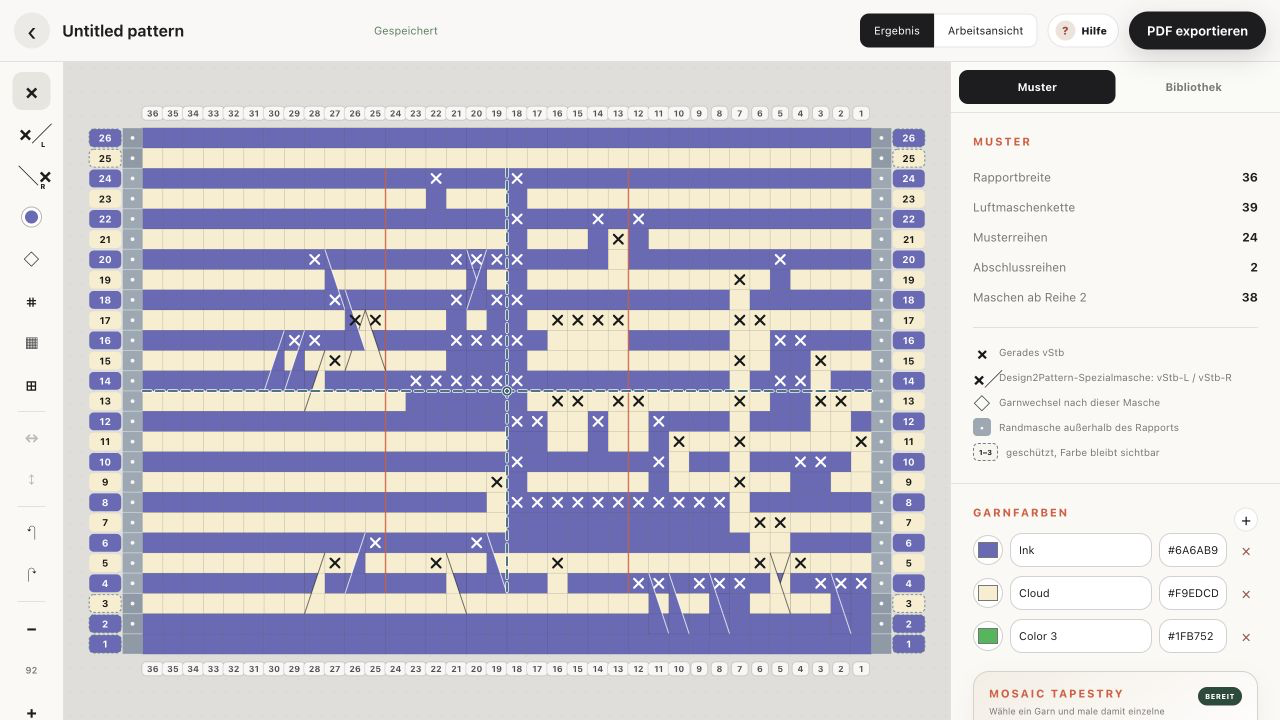
Straight drop-down stitch (X)
Choose the X tool, then click or drag across editable cells. An X means a drop-down double crochet worked into the free front loop two physical rows below.
Diagonal DDC-L and DDC-R
The two diagonal tools are Design2Pattern special stitches. DDC-L anchors one stitch to the left; DDC-R anchors one stitch to the right, both two rows below. The coloured wedge in Result view points toward that anchor.
Eraser
Choose the eraser and click or drag across cells you want to clear. It removes both the stitch symbol and any individual Mosaic Tapestry colour. To remove only an individual colour while keeping the stitch, choose “Row colour” in Mosaic Tapestry and paint that cell.
Protected rows and completion rows
Rows 1–3 are the foundation area and cannot receive drop-down stitches. Two completion rows are added above the pattern so the last drop-down lines can be closed. Their colour remains visible but their cells are protected.
Border stitches
The small columns on the left and right are border stitches outside the repeat. They are counted in the foundation chain, written rows, finished size and PDF, but you do not draw motif stitches in them.
Add and name yarn colours
The Yarn colours panel lists every colour, name and hex value. Choose + to add up to twelve colours. Names appear in written instructions and PDF materials. A colour can be removed only after it is no longer used by the row colour plan.
Colour individual cells with Mosaic Tapestry
Use Mosaic Tapestry when one object needs several colours—for example a green zero or a sheep with a white body and black face and legs. Choose a yarn chip, then click or drag over the cells that should use it. The colour brush changes only yarn colour; it does not add or remove the X stitch. X always means a drop-down stitch. A small diamond marks a yarn change after that stitch while you work from right to left.
- Add and name every yarn you need.
- Under Mosaic Tapestry, choose the yarn colour.
- The colour-brush tool becomes active automatically.
- Click or drag across the exact cells that need this yarn.
- Choose “Row colour” and paint a cell to remove its individual override.
- Wait for “Saved” before leaving the editor.
Crochet Mosaic Tapestry rows
Carry inactive yarns neatly behind the work. Complete the final yarn-over of the stitch before a marked change with the new colour, then continue with that yarn. The written instructions say “change to …” at every boundary. More than ten changes in one row produces a warning so accidental speckles are easy to find.
Create a row colour plan
Choose “+ Colour change” to split the pattern into sections. Set the first row and choose Colour A and Colour B for each section. The established A/B row parity continues across the boundary; a new section replaces its yarns but never restarts the alternation. The four small bars preview the actual next rows.
- Add the yarn colours you need.
- Choose “+ Colour change”.
- Set the first row of the new section.
- Choose two different colours.
- Check the four-bar sequence and wait for “Saved”.
Keep colour transitions crochet-safe
A drop-down stitch must reach a compatible yarn colour two physical rows below. If a colour change makes an anchor unsafe, Checks identifies the exact row. Remove that drop-down stitch or move the colour change. Design2Pattern continues the final colour pair automatically through both completion rows.